iOS原生地图开发指南再续——地图覆盖物的应用
一、引言
在前两篇博客中,将iOS系统的地图框架MapKit中地图的设置与应用以及关于添加大头针和自定义大头针的相关操作做了详细的介绍。链接如下:http://my.oschina.net/u/2340880/blog/415360、http://my.oschina.net/u/2340880/blog/415441。这篇博客中将进一步讨论关于地图添加覆盖物的使用方法。
二、添加地图覆盖物的逻辑原理
地图覆盖物其实就是在地图上画一些东西,例如路径,范围等等。添加地图覆盖物的逻辑原理其实和添加大头针很相似。首先所有可以成为覆盖物的对象必须遵守MKOverlay这个协议,通过
- (void)addOverlay:(id )overlay;
将覆盖物添加在地图上,然后地图会调用代理方法
-(MKOverlayRenderer )mapView:(MKMapView )mapView rendererForOverlay:(id)overlay;
对覆盖物进行绘制,我们可以在这个方法中设置覆盖物,例如线宽,颜色等,注意,必须实现这个方法,覆盖物才会显示。
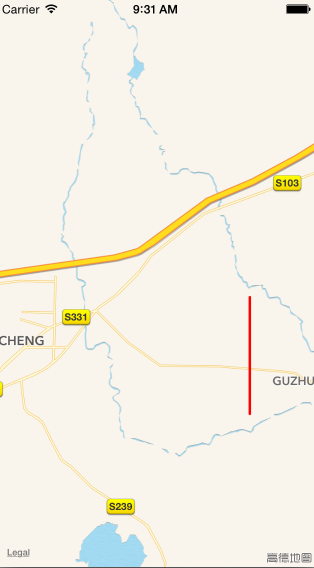
1、添加折线覆盖物
1
2
3
4
5
6
7
8
9
10
11
12
13
14
15
16
17
18
19
20
21
22
23
24
25
26
27
28
29
30
31
| - (void)viewDidLoad {
[super viewDidLoad];
// Do any additional setup after loading the view, typically from a nib.
//初始化地图对象
MKMapView * _mapView = [[MKMapView alloc]initWithFrame:self.view.frame];
//设置地图
_mapView.region=MKCoordinateRegionMake(CLLocationCoordinate2DMake(33.23, 113.122), MKCoordinateSpanMake(10, 10));
//设置代理
_mapView.delegate=self;
//下面是C的语法,创建一个结构体数组
CLLocationCoordinate2D *coor;
coor = malloc(sizeof(CLLocationCoordinate2D)*5);
for (int i=0; i<5; i++) {
CLLocationCoordinate2D po = CLLocationCoordinate2DMake(33.23+i*0.01, 113.112);
coor[i]=po;
}
//创建一个折线对象
MKPolyline * line = [MKPolyline polylineWithCoordinates:coor count:5];
[_mapView addOverlay:line];
[self.view addSubview:_mapView];
}
//覆盖物绘制的代理
-(MKOverlayRenderer *)mapView:(MKMapView *)mapView rendererForOverlay:(id<MKOverlay>)overlay{
//折线覆盖物提供类
MKPolylineRenderer * render = [[MKPolylineRenderer alloc]initWithPolyline:overlay];
//设置线宽
render.lineWidth=3;
//设置颜色
render.strokeColor=[UIColor redColor];
return render;
}
|
效果如下:

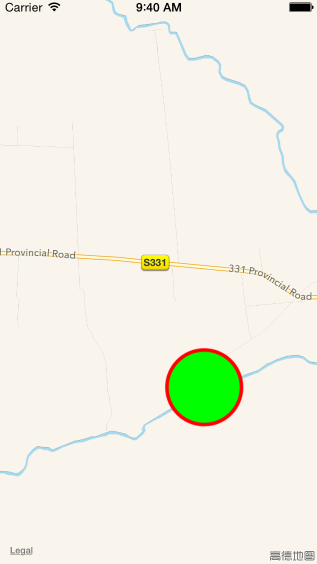
2、添加圆形覆盖物
1
2
3
4
5
6
7
8
9
10
11
12
13
14
15
16
17
18
19
20
| - (void)viewDidLoad {
[super viewDidLoad];
// Do any additional setup after loading the view, typically from a nib.
MKMapView * _mapView = [[MKMapView alloc]initWithFrame:self.view.frame];
_mapView.region=MKCoordinateRegionMake(CLLocationCoordinate2DMake(33.23, 113.122), MKCoordinateSpanMake(10, 10));
_mapView.delegate=self;
//创建圆形覆盖物对象
MKCircle * cirle = [MKCircle circleWithCenterCoordinate:CLLocationCoordinate2DMake(33.23, 113.122) radius:500];
[_mapView addOverlay:cirle];
[self.view addSubview:_mapView];
}
-(MKOverlayRenderer *)mapView:(MKMapView *)mapView rendererForOverlay:(id<MKOverlay>)overlay{
MKCircleRenderer * render=[[MKCircleRenderer alloc]initWithCircle:overlay];
render.lineWidth=3;
//填充颜色
render.fillColor=[UIColor greenColor];
//线条颜色
render.strokeColor=[UIColor redColor];
return render;
}
|
效果如下:

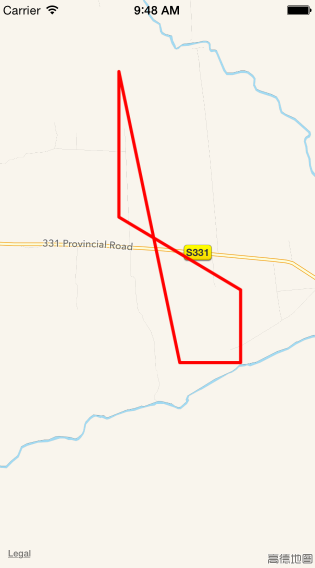
3、添加多边形覆盖物
1
2
3
4
5
6
7
8
9
10
11
12
13
14
15
16
17
18
19
20
21
22
23
| - (void)viewDidLoad {
[super viewDidLoad];
// Do any additional setup after loading the view, typically from a nib.
MKMapView * _mapView = [[MKMapView alloc]initWithFrame:self.view.frame];
_mapView.region=MKCoordinateRegionMake(CLLocationCoordinate2DMake(33.23, 113.122), MKCoordinateSpanMake(10, 10));
_mapView.delegate=self;
CLLocationCoordinate2D *coor;
coor = malloc(sizeof(CLLocationCoordinate2D)*6);
for (int i=0; i<5; i++) {
CLLocationCoordinate2D po = CLLocationCoordinate2DMake(33.23+i*0.01, 113.112+((i/2==0)?0.01:-0.01));
coor[i]=po;
}
coor[5]=CLLocationCoordinate2DMake(33.23, 113.112);
MKPolygon * gon = [MKPolygon polygonWithCoordinates:coor count:6];
[_mapView addOverlay:gon];
[self.view addSubview:_mapView];
}
-(MKOverlayRenderer *)mapView:(MKMapView *)mapView rendererForOverlay:(id<MKOverlay>)overlay{
MKPolygonRenderer * render = [[MKPolygonRenderer alloc]initWithPolygon:overlay];
render.lineWidth=3;
render.strokeColor=[UIColor redColor];
return render;
}
|
效果如下:

疏漏之处 欢迎指正
学习使用 欢迎转载
专注技术,热爱生活,交流技术,也做朋友。
——珲少 QQ群:203317592


