iOS流布局UICollectionView系列五——圆环布局的实现
一、引言
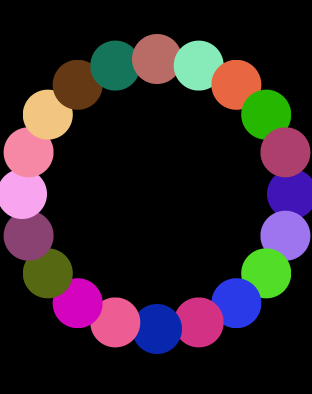
前边的几篇博客,我们了解了UICollectionView的基本用法以及一些扩展,在不定高的瀑布流布局中,我们发现,可以通过设置具体的布局属性类UICollectionViewLayoutAttributes来设置设置每个item的具体位置,我们可以再扩展一下,如果位置我们可以自由控制,那个布局我们也可以更加灵活,就比如创建一个如下的circleLayout:

这种布局方式在apple的官方文档中也有介绍,是UICollectionView的一个应用示例。
二、设计一个圆环布局
接着我们以前的想法,依然时候随机颜色的色块来表达我们的item,先自定义一个layout类,这个类继承于UICollectionViewLayout,UICollectionLayout是一个布局抽象基类,我们要使用自定义的布局方式,必须将其子类化,可能你还记得,我们在进行瀑布流布局的时候使用过UICollectionViewFlowLayout类,这个类就是继承于UICollectionViewLayout类,系统为我们实现好的一个布局方案。
1
2
3
4
| @interface MyLayout : UICollectionViewLayout
//这个int值存储有多少个item
@property(nonatomic,assign)int itemCount;
@end
|
我们需要重写这个类的三个方法,来进行圆环布局的设置,首先是prepareLayout,为布局做一些准备工作,使用collectionViewContentSize来设置内容的区域大小,最后使用layoutAttributesForElementsInRect方法来返回我们的布局信息字典,这个前面瀑布流布局的思路是一样的:
1
2
3
4
5
6
7
8
9
10
11
12
13
14
15
16
17
18
19
20
21
22
23
24
25
26
27
28
29
30
31
32
33
34
35
36
37
38
39
40
41
42
43
44
45
46
| @implementation MyLayout
{
NSMutableArray * _attributeAttay;
}
-(void)prepareLayout{
[super prepareLayout];
//获取item的个数
_itemCount = (int)[self.collectionView numberOfItemsInSection:0];
_attributeAttay = [[NSMutableArray alloc]init];
//先设定大圆的半径 取长和宽最短的
CGFloat radius = MIN(self.collectionView.frame.size.width, self.collectionView.frame.size.height)/2;
//计算圆心位置
CGPoint center = CGPointMake(self.collectionView.frame.size.width/2, self.collectionView.frame.size.height/2);
//设置每个item的大小为50*50 则半径为25
for (int i=0; i<_itemCount; i++) {
UICollectionViewLayoutAttributes * attris = [UICollectionViewLayoutAttributes layoutAttributesForCellWithIndexPath:[NSIndexPath indexPathForItem:i inSection:0]];
//设置item大小
attris.size = CGSizeMake(50, 50);
//计算每个item的圆心位置
/*
.
. .
. . r
. .
.........
*/
//计算每个item中心的坐标
//算出的x y值还要减去item自身的半径大小
float x = center.x+cosf(2*M_PI/_itemCount*i)*(radius-25);
float y = center.y+sinf(2*M_PI/_itemCount*i)*(radius-25);
attris.center = CGPointMake(x, y);
[_attributeAttay addObject:attris];
}
}
//设置内容区域的大小
-(CGSize)collectionViewContentSize{
return self.collectionView.frame.size;
}
//返回设置数组
-(NSArray<UICollectionViewLayoutAttributes *> *)layoutAttributesForElementsInRect:(CGRect)rect{
return _attributeAttay;
}
|
在viewController中代码如下:
1
2
3
4
5
6
7
8
9
10
11
12
13
14
15
16
17
18
19
20
21
22
23
24
25
| - (void)viewDidLoad {
[super viewDidLoad];
// Do any additional setup after loading the view, typically from a nib.
MyLayout * layout = [[MyLayout alloc]init];
UICollectionView * collect = [[UICollectionView alloc]initWithFrame:CGRectMake(0, 0, 320, 400) collectionViewLayout:layout];
collect.delegate=self;
collect.dataSource=self;
[collect registerClass:[UICollectionViewCell class] forCellWithReuseIdentifier:@"cellid"];
[self.view addSubview:collect];
}
-(NSInteger)numberOfSectionsInCollectionView:(UICollectionView *)collectionView{
return 1;
}
-(NSInteger)collectionView:(UICollectionView *)collectionView numberOfItemsInSection:(NSInteger)section{
return 10;
}
-(UICollectionViewCell *)collectionView:(UICollectionView *)collectionView cellForItemAtIndexPath:(NSIndexPath *)indexPath{
UICollectionViewCell * cell = [collectionView dequeueReusableCellWithReuseIdentifier:@"cellid" forIndexPath:indexPath];
cell.layer.masksToBounds = YES;
cell.layer.cornerRadius = 25;
cell.backgroundColor = [UIColor colorWithRed:arc4random()%255/255.0 green:arc4random()%255/255.0 blue:arc4random()%255/255.0 alpha:1];
return cell;
}
|
如上非常简单的一些逻辑控制,我们就实现哦圆环布局,随着item的多少,布局会自动调整,如果不是UICollectionView的功劳,实现这样的功能,我们可能要写上一阵子了^_^。

专注技术,热爱生活,交流技术,也做朋友。
——珲少 QQ群:203317592

