iOS流布局UICollectionView系列七——三维中的球型布局
一、引言
通过6篇的博客,从平面上最简单的规则摆放的布局,到不规则的瀑布流布局,再到平面中的圆环布局,我们突破了线性布局的局限,在后面,我们将布局扩展到了空间,在Z轴上进行了平移,我们实现了一个类似UIPickerView的布局模型,其实我们还可以再进一步,类比于平面布局,picKerView只是线性排列布局在空间上的旋转与平移,这次,我们更加充分了利用一下空间的尺寸,来设计一个圆球的布局模型。以下是前几篇博客地址:
1.初识与简单实用UICollectionView:http://my.oschina.net/u/2340880/blog/522613
2.UICollectionView的代理方法:http://my.oschina.net/u/2340880/blog/522682
3.实用FlowLayout进行更灵活布局:http://my.oschina.net/u/2340880/blog/522748
4.自定义FlowLayout进行瀑布流布局:http://my.oschina.net/u/2340880/blog/522806
5.平面圆环布局的实现:http://my.oschina.net/u/2340880/blog/523064
6.将布局从平面应用到空间:http://my.oschina.net/u/2340880/blog/523341
二、将布局扩展为空间球型
在viewController中先实现一些准备代码:
1
2
3
4
5
6
7
8
9
10
11
12
13
14
15
16
17
18
19
20
21
22
23
24
25
26
27
28
29
30
31
32
33
34
35
36
37
38
39
40
41
42
43
44
45
46
| - (void)viewDidLoad {
[super viewDidLoad];
// Do any additional setup after loading the view, typically from a nib.
MyLayout * layout = [[MyLayout alloc]init];
UICollectionView * collect = [[UICollectionView alloc]initWithFrame:CGRectMake(0, 0, 320, 400) collectionViewLayout:layout];
collect.delegate=self;
collect.dataSource=self;
//这里设置的偏移量是为了无缝进行循环的滚动,具体在上一篇博客中有解释
collect.contentOffset = CGPointMake(320, 400);
[collect registerClass:[UICollectionViewCell class] forCellWithReuseIdentifier:@"cellid"];
[self.view addSubview:collect];
}
-(NSInteger)numberOfSectionsInCollectionView:(UICollectionView *)collectionView{
return 1;
}
//我们返回30的标签
-(NSInteger)collectionView:(UICollectionView *)collectionView numberOfItemsInSection:(NSInteger)section{
return 30;
}
-(UICollectionViewCell *)collectionView:(UICollectionView *)collectionView cellForItemAtIndexPath:(NSIndexPath *)indexPath{
UICollectionViewCell * cell = [collectionView dequeueReusableCellWithReuseIdentifier:@"cellid" forIndexPath:indexPath];
cell.backgroundColor = [UIColor colorWithRed:arc4random()%255/255.0 green:arc4random()%255/255.0 blue:arc4random()%255/255.0 alpha:1];
UILabel * label = [[UILabel alloc]initWithFrame:CGRectMake(0, 0, 30, 30)];
label.text = [NSString stringWithFormat:@"%ld",(long)indexPath.row];
[cell.contentView addSubview:label];
return cell;
}
- (void)didReceiveMemoryWarning {
[super didReceiveMemoryWarning];
// Dispose of any resources that can be recreated.
}
//这里对滑动的contentOffset进行监控,实现循环滚动
-(void)scrollViewDidScroll:(UIScrollView *)scrollView{
if (scrollView.contentOffset.y<200) {
scrollView.contentOffset = CGPointMake(scrollView.contentOffset.x, scrollView.contentOffset.y+10*400);
}else if(scrollView.contentOffset.y>11*400){
scrollView.contentOffset = CGPointMake(scrollView.contentOffset.x, scrollView.contentOffset.y-10*400);
}
if (scrollView.contentOffset.x<160) {
scrollView.contentOffset = CGPointMake(scrollView.contentOffset.x+10*320,scrollView.contentOffset.y);
}else if(scrollView.contentOffset.x>11*320){
scrollView.contentOffset = CGPointMake(scrollView.contentOffset.x-10*320,scrollView.contentOffset.y);
}
}
|
这里面的代码比较上一篇博客中的并没有什么大的改动,只是做了横坐标的兼容。
在我们的layout类中,将代码修改成如下:
1
2
3
4
5
6
7
8
9
10
11
12
13
14
15
16
17
18
19
20
21
22
23
24
25
26
27
28
29
30
31
32
33
34
35
36
37
38
39
40
41
42
43
44
45
46
47
48
49
50
51
52
53
54
55
56
57
58
59
| -(void)prepareLayout{
[super prepareLayout];
}
//返回的滚动范围增加了对x轴的兼容
-(CGSize)collectionViewContentSize{
return CGSizeMake( self.collectionView.frame.size.width*([self.collectionView numberOfItemsInSection:0]+2), self.collectionView.frame.size.height*([self.collectionView numberOfItemsInSection:0]+2));
}
-(BOOL)shouldInvalidateLayoutForBoundsChange:(CGRect)newBounds{
return YES;
}
-(UICollectionViewLayoutAttributes *)layoutAttributesForItemAtIndexPath:(NSIndexPath *)indexPath{
UICollectionViewLayoutAttributes * atti = [UICollectionViewLayoutAttributes layoutAttributesForCellWithIndexPath:indexPath];
//获取item的个数
int itemCounts = (int)[self.collectionView numberOfItemsInSection:0];
atti.center = CGPointMake(self.collectionView.frame.size.width/2+self.collectionView.contentOffset.x, self.collectionView.frame.size.height/2+self.collectionView.contentOffset.y);
atti.size = CGSizeMake(30, 30);
CATransform3D trans3D = CATransform3DIdentity;
trans3D.m34 = -1/900.0;
CGFloat radius = 15/tanf(M_PI*2/itemCounts/2);
//根据偏移量 改变角度
//添加了一个x的偏移量
float offsety = self.collectionView.contentOffset.y;
float offsetx = self.collectionView.contentOffset.x;
//分别计算偏移的角度
float angleOffsety = offsety/self.collectionView.frame.size.height;
float angleOffsetx = offsetx/self.collectionView.frame.size.width;
CGFloat angle1 = (float)(indexPath.row+angleOffsety-1)/itemCounts*M_PI*2;
//x,y的默认方向相反
CGFloat angle2 = (float)(indexPath.row-angleOffsetx-1)/itemCounts*M_PI*2;
//这里我们进行四个方向的排列
if (indexPath.row%4==1) {
trans3D = CATransform3DRotate(trans3D, angle1, 1.0,0, 0);
}else if(indexPath.row%4==2){
trans3D = CATransform3DRotate(trans3D, angle2, 0, 1, 0);
}else if(indexPath.row%4==3){
trans3D = CATransform3DRotate(trans3D, angle1, 0.5,0.5, 0);
}else{
trans3D = CATransform3DRotate(trans3D, angle1, 0.5,-0.5,0);
}
trans3D = CATransform3DTranslate(trans3D, 0, 0, radius);
atti.transform3D = trans3D;
return atti;
}
-(NSArray<UICollectionViewLayoutAttributes *> *)layoutAttributesForElementsInRect:(CGRect)rect{
NSMutableArray * attributes = [[NSMutableArray alloc]init];
//遍历设置每个item的布局属性
for (int i=0; i<[self.collectionView numberOfItemsInSection:0]; i++) {
[attributes addObject:[self layoutAttributesForItemAtIndexPath:[NSIndexPath indexPathForItem:i inSection:0]]];
}
return attributes;
}
|
布局效果如下:
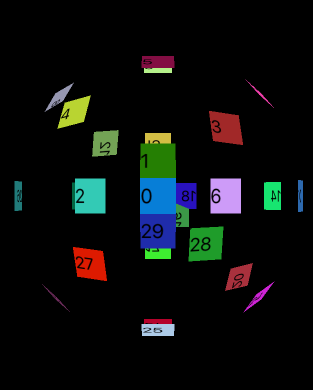
滑动屏幕,这个圆球是可以进行滚动的。
TIP:这里我们只平均分配了四个方向上的布局,如果item更加小也更加多,我们可以分配到更多的方向上,使球体更加充实。
专注技术,热爱生活,交流技术,也做朋友。
——珲少 QQ群:203317592