iOS开发中标签控制器的使用——UITabBarController
一、引言
与导航控制器相类似,标签控制器也是用于管理视图控制器的一个UI控件,在其内部封装了一个标签栏,与导航不同的是,导航的管理方式是纵向的,采用push与pop切换控制器,标签的管理是横向的,通过标签的切换来改变控制器,一般我们习惯将tabBar作为应用程序的根视图控制器,在其中添加导航,导航中在对ViewController进行管理。
二、创建一个标签控制器
通过如下的步骤,我们可以很简便的创建一个TabBarController:
1
2
3
4
5
6
7
8
9
10
11
12
13
| UITabBarController * tabBar= [[UITabBarController alloc]init];
NSMutableArray * controllerArray = [[NSMutableArray alloc]init];
for (int i=0; i<4; i++) {
UIViewController * con = [[UIViewController alloc]init];
[con loadViewIfNeeded];
con.view.backgroundColor = [UIColor colorWithRed:arc4random()%255/255.0 green:arc4random()%255/255.0 blue:arc4random()%255/255.0 alpha:1];
con.tabBarItem.image = [UIImage imageNamed:@"btn_publish_face_a.png"];
con.tabBarItem.title=[NSString stringWithFormat:@"%d",i+1];
con.title = [NSString stringWithFormat:@"%d",i+1];
[controllerArray addObject:con];
}
tabBar.viewControllers = controllerArray;
[self presentViewController:tabBar animated:YES completion:nil];
|

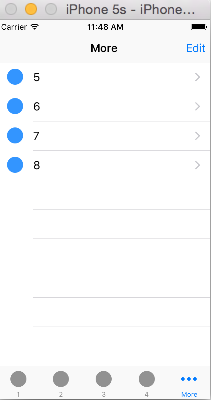
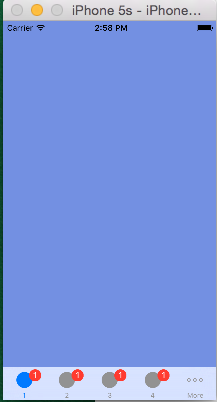
通过点击下面的标签按钮,可以很方便的切换控制器。如果我们的控制器数超过4个,系统会被我们创建一个more的导航,并且可以通过系统自带的编辑来调整控制器的顺序,如下:


三、UITabBarController的属性和方法
1
2
3
4
5
6
7
8
9
10
11
12
13
14
15
| //管理的viewController数组
@property(nullable, nonatomic,copy) NSArray<__kindof UIViewController *> *viewControllers;
- (void)setViewControllers:(NSArray<__kindof UIViewController *> * __nullable)viewControllers animated:(BOOL)animated;
//选中的ViewControlle
@property(nullable, nonatomic, assign) __kindof UIViewController *selectedViewController;
//通过编号设置选中ViewController
@property(nonatomic) NSUInteger selectedIndex;
//当viewController大于4个时,获取"更多"标签的导航控制器
@property(nonatomic, readonly) UINavigationController *moreNavigationController;
//这个属性设置的是可以进行自定义排列顺序的视图控制器,如上面第二张图中的,默认是全部
@property(nullable, nonatomic, copy) NSArray<__kindof UIViewController *> *customizableViewControllers;
//标签控制器中分装的标签栏
@property(nonatomic,readonly) UITabBar *tabBar NS_AVAILABLE_IOS(3_0);
//代理
@property(nullable, nonatomic,weak) id<UITabBarControllerDelegate> delegate;
|
四、关于标签栏TabBar
通过自定义标签栏的一些属性,使我们可以更加灵活的使用tabBar。
1、UITabBar属性和方法
设置标签:
1
2
3
4
| @property(nullable,nonatomic,copy) NSArray<UITabBarItem *> *items;
//设置选中的标签
@property(nullable,nonatomic,assign) UITabBarItem *selectedItem;
- (void)setItems:(nullable NSArray<UITabBarItem *> *)items animated:(BOOL)animated;
|
设置自定义标签顺序:
1
2
3
4
5
6
| //调用这个方法会弹出一个类似上面第二张截图的控制器,我们可以交换标签的布局顺序
- (void)beginCustomizingItems:(NSArray<UITabBarItem *> *)items;
//完成标签布局
- (BOOL)endCustomizingAnimated:(BOOL)animated;
//是否正在自定义标签布局
- (BOOL)isCustomizing;
|
设置tabBar颜色相关:
1
2
3
4
| //设置渲染颜色,会影响选中字体和图案的渲染
@property(null_resettable, nonatomic,strong) UIColor *tintColor;
//设置导航栏的颜色
@property(nullable, nonatomic,strong) UIColor *barTintColor;
|
设置背景图案:
1
2
3
4
5
6
| //设置导航栏背景图案
@property(nullable, nonatomic,strong) UIImage *backgroundImage;
//设置选中一个标签时,标签背后的选中提示图案 这个会出现在设置的item图案的后面
@property(nullable, nonatomic,strong) UIImage *selectionIndicatorImage;
//设置阴影的背景图案
@property(nullable, nonatomic,strong) UIImage *shadowImage
|
TabBar中标签的宏观属性:
1
2
3
4
5
6
7
8
9
10
11
12
| //设置标签item的位置模式
@property(nonatomic) UITabBarItemPositioning itemPositioning;
//枚举如下
typedef NS_ENUM(NSInteger, UITabBarItemPositioning) {
UITabBarItemPositioningAutomatic,//自动
UITabBarItemPositioningFill,//充满
UITabBarItemPositioningCentered,//中心
} NS_ENUM_AVAILABLE_IOS(7_0);
//设置item宽度
@property(nonatomic) CGFloat itemWidth;
//设置item间距
@property(nonatomic) CGFloat itemSpacing;
|
与导航栏类似,也可以设置tabBar的风格和透明效果:
1
2
3
4
| //风格 分黑白两种
@property(nonatomic) UIBarStyle barStyle;
//是否透明效果
@property(nonatomic,getter=isTranslucent) BOOL translucent;
|
2、UITabBarDelegate
1
2
3
4
5
6
7
8
9
| //选中标签时调用
- (void)tabBar:(UITabBar *)tabBar didSelectItem:(UITabBarItem *)item;
//将要开始编辑标签时
- (void)tabBar:(UITabBar *)tabBar willBeginCustomizingItems:(NSArray<UITabBarItem *> *)items; //已经开始编辑标签时
- (void)tabBar:(UITabBar *)tabBar didBeginCustomizingItems:(NSArray<UITabBarItem *> *)items;
//将要进入编辑状态时
- (void)tabBar:(UITabBar *)tabBar willEndCustomizingItems:(NSArray<UITabBarItem *> *)items changed:(BOOL)changed;
//已经进入编辑状态时
- (void)tabBar:(UITabBar *)tabBar didEndCustomizingItems:(NSArray<UITabBarItem *> *)items changed:(BOOL)changed;
|
五、再看UITabBarItem
和NavigationItem类似,标签栏上的item也可以自定义,一些方法如下。
初始化方法:
1
2
3
4
5
| //通过标题和图案进行创建
- (instancetype)initWithTitle:(nullable NSString *)title image:(nullable UIImage *)image tag:(NSInteger)tag;
- (instancetype)initWithTitle:(nullable NSString *)title image:(nullable UIImage *)image selectedImage:(nullable UIImage *)selectedImage;
//创建系统类型的
- (instancetype)initWithTabBarSystemItem:(UITabBarSystemItem)systemItem tag:(NSInteger)tag;
|
UITabBarSystemItem的枚举如下:
1
2
3
4
5
6
7
8
9
10
11
12
13
14
| typedef NS_ENUM(NSInteger, UITabBarSystemItem) {
UITabBarSystemItemMore,//更多图标
UITabBarSystemItemFavorites,//最爱图标
UITabBarSystemItemFeatured,//特征图标
UITabBarSystemItemTopRated,//高级图标
UITabBarSystemItemRecents,//最近图标
UITabBarSystemItemContacts,//联系人图标
UITabBarSystemItemHistory,//历史图标
UITabBarSystemItemBookmarks,//图书图标
UITabBarSystemItemSearch,//查找图标
UITabBarSystemItemDownloads,//下载图标
UITabBarSystemItemMostRecent,//记录图标
UITabBarSystemItemMostViewed,//全部查看图标
};
|
UITabBarItem常用属性:
1
2
| //设置选中图案
@property(nullable, nonatomic,strong) UIImage *selectedImage;
|
下面这个属性可以设置item的头标文字:
1
| con.tabBarItem.badgeValue = @"1";
|

1
2
| //设置标题的位置偏移
@property (nonatomic, readwrite, assign) UIOffset titlePositionAdjustment;
|
由于UITabBarItem是继承于UIBarItem,还有下面这个属性可以设置使用:
1
2
3
4
5
6
7
8
9
10
11
12
13
| //标题
@property(nullable, nonatomic,copy) NSString *title;
//图案
@property(nullable, nonatomic,strong) UIImage *image;
//横屏时的图案
@property(nullable, nonatomic,strong) UIImage *landscapeImagePhone;
//图案位置偏移
@property(nonatomic) UIEdgeInsets imageInsets;
//横屏时的图案位置偏移
@property(nonatomic) UIEdgeInsets landscapeImagePhoneInsets ;
//设置和获取标题的字体属性
- (void)setTitleTextAttributes:(nullable NSDictionary<NSString *,id> *)attributes forState:(UIControlState)state;
- (nullable NSDictionary<NSString *,id> *)titleTextAttributesForState:(UIControlState)state;
|
专注技术,热爱生活,交流技术,也做朋友。
——珲少 QQ群:203317592


