使用Python编写iOS原生应用的框架设计思考(首篇)
一、引子
使用Python编写iOS原生应用,为何有这样的想法,其实本来是源于对JS类的跨平台框架的学习。熟悉原生开发的同学们都知道,对于可跨平台的原生框架,使用JS实现的占了大半,其原因是由于Apple内置了JavaScriptCore这样一个JS引擎,使得JavaScript与Objective-C的交互变得非常容易,能够交互,我们就可以容易的编写出各种各样的桥来为JS端提供原生功能,随着原生端桥的全面支持和JS端组件的丰富,一个完整的矿平台框架就诞生了。虽说这是一个庞大的工程,但是实现思路并不深奥,之前也有博客也有介绍:
https://my.oschina.net/u/2340880/blog/856321
有了JavaScript框架实现思路的基础,那么不免就很容易想到,其实在语言层面,语言可以做的事情都是相似的,只要有对应的引擎可用,那么原则上说,任何语言都可以编写iOS应用程序,只有难以与方便与否的差别。对于Python来说,其的确有iOS版本的解释器可用。
二、在iOS平台使用Python解释器
Github上有很多有趣的项目,其中有一个项目可以将Python源码编译成可以在iOS平台运行的Framework,其地址如下:
https://github.com/beeware/Python-Apple-support
有了这个工具,我们可以选择任意版本的Python来将其打包成Framework在iOS平台运行,当然如果你对版本没有特殊的要求,你也可以直接从下面的地址下载已经打包好的Framewok使用:
https://github.com/pybee/Python-iOS-support/releases
下载完成后,会得到两个Framework,将他们添加进工程,并进行链接,如下图:
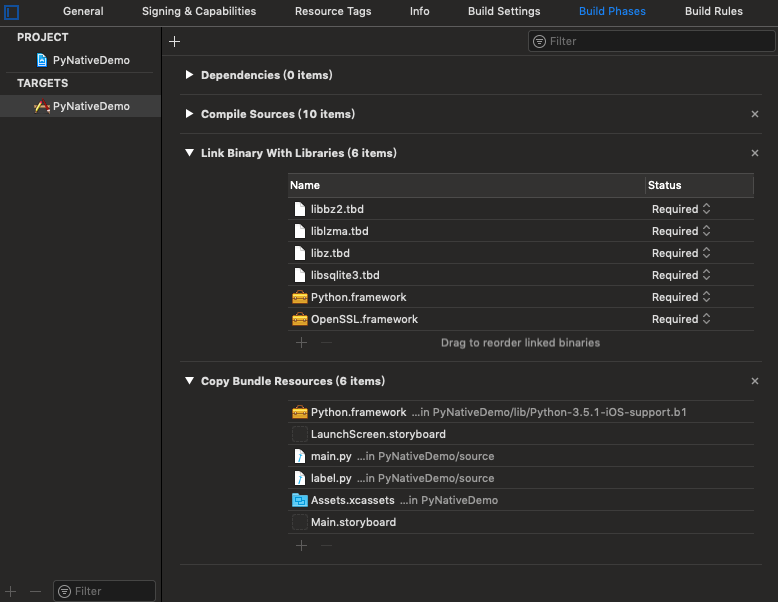
需要注意,对于Python.framework要更特殊一点,我们需要将其拷贝进工程的Bundle中,以便后续使用。
三、编写桥接文件
这部分主要有Objective-C实现,用来启动Python引擎,加载Python业务代码的入口文件,做各种原生组件与Python组件的桥接等。首先编写一个头文件用来进行静态变量和宏的定义,如下:
1
2
3
4
5
6
7
8
9
10
11
12
13
14
15
16
17
18
19
20
21
22
23
24
25
26
27
28
29
30
|
#ifndef BrdgeDefine_h
#define BrdgeDefine_h
#import <Python/Python.h>
#define INTERFACE_INSTANCE + (instancetype)sharedInstance;
#define IMPLEMENTATION_INSTANCE \
+ (instancetype)sharedInstance { \
static id instance = nil; \
static dispatch_once_t onceToken; \
dispatch_once(&onceToken, ^{ \
if (!instance) { \
instance = [[self alloc] init]; \
} \
}); \
return instance; \
}
#define SELF_INSTANCE [self.class sharedInstance]
#endif /* BrdgeDefine_h */
|
编写Python桥的引擎类,如下:
BridgeEnigine.h:
1
2
3
4
5
6
7
8
9
10
11
12
13
14
| #import <Foundation/Foundation.h>
#import "BrdgeDefine.h"
#import <UIKit/UIKit.h>
NS_ASSUME_NONNULL_BEGIN
@interface BridgeEngine : NSObject
INTERFACE_INSTANCE
+ (UIViewController *)setupEngine;
@end
NS_ASSUME_NONNULL_END
|
BridgeEnigine.m:
1
2
3
4
5
6
7
8
9
10
11
12
13
14
15
16
17
18
19
20
21
22
23
24
25
26
27
28
29
30
31
32
33
34
35
36
37
38
39
40
41
42
43
44
45
46
47
48
49
50
51
52
53
54
55
56
57
58
59
60
61
62
| #import "BridgeEngine.h"
#import "DisplayRender.h"
#import "PythonRun.h"
@interface BridgeEngine ()
@end
@implementation BridgeEngine
IMPLEMENTATION_INSTANCE
+ (UIViewController *)setupEngine {
[SELF_INSTANCE startEngine];
[SELF_INSTANCE loadLib];
[SELF_INSTANCE runMain];
return [SELF_INSTANCE renderRoot];
}
- (void)startEngine {
NSString* frameworkPath = [NSString stringWithFormat:@"%@/Resources",[SELF_INSTANCE p_pythonFrameworkPath]];
wchar_t *pythonHome = [SELF_INSTANCE stingTowWchar_t:frameworkPath];
Py_SetPythonHome(pythonHome);
Py_Initialize();
PyEval_InitThreads();
if (Py_IsInitialized()) {
NSLog(@"😄初始化环境成功😄");
} else {
NSLog(@"😢Python初始化环境失败😢");
exit(0);
}
}
- (void)loadLib {
NSString *path = [NSString stringWithFormat:@"import sys\nsys.path.append(\"%@\")",[[NSBundle mainBundle] resourcePath]];
PyRun_SimpleString([path UTF8String]);
NSLog(@"😄lib加载成功😄");
}
- (void)runMain {
PyObject * pModule = PyImport_ImportModule([@"main" UTF8String]);
[PythonRun sharedInstance].mainItemDic = PyModule_GetDict(pModule);
}
- (UIViewController *)renderRoot {
return [[DisplayRender sharedInstance] renderRoot:@"Main"];
}
- (wchar_t *)stingTowWchar_t:(NSString*)string {
return (wchar_t*)[string cStringUsingEncoding:NSUTF32StringEncoding];
}
- (NSString*)p_pythonFrameworkPath{
NSString* path = [[NSBundle mainBundle] pathForResource:@"Python" ofType:@"framework"];
return path;
}
- (void)dealloc {
Py_Finalize();
}
@end
|
其中有使用到DisplayRender,由于Python没有办法主动调用原生,初步设想,让这个类通过帧刷新来负责对界面的渲染维护,编码如下:
DisplayRender.h:
1
2
3
4
5
6
7
8
9
10
11
12
13
14
15
| #import <Foundation/Foundation.h>
#import <UIKit/UIKit.h>
#import "BrdgeDefine.h"
NS_ASSUME_NONNULL_BEGIN
@interface DisplayRender : NSObject
INTERFACE_INSTANCE
- (UIViewController *)renderRoot:(NSString *)main;
@end
NS_ASSUME_NONNULL_END
|
DisplayRender.m:
1
2
3
4
5
6
7
8
9
10
11
12
13
14
15
16
17
18
19
20
21
22
23
24
25
26
27
28
29
30
31
32
33
34
35
36
37
38
39
40
41
42
43
44
45
46
47
48
49
50
51
52
53
| #import "DisplayRender.h"
#import "PythonRun.h"
#import "BridgeColor.h"
#import "ViewMaker.h"
@interface DisplayRender ()
@property (nonatomic, strong) UIViewController *rootController;
@property (nonatomic, strong) NSMutableArray<UIView *> *subViews;
@end
@implementation DisplayRender
IMPLEMENTATION_INSTANCE
- (UIViewController *)renderRoot:(NSString *)main {
NSDictionary *root = [[PythonRun sharedInstance] run:[main UTF8String] method:[@"render_main_view" UTF8String]];
NSLog(@"AppLaunchFinish🙅♀️");
[self renderController:root];
return self.rootController;
}
- (void)renderController:(NSDictionary *)info {
[self.subViews enumerateObjectsUsingBlock:^(UIView * _Nonnull obj, NSUInteger idx, BOOL * _Nonnull stop) {
[obj removeFromSuperview];
}];
[self.subViews removeAllObjects];
NSString *bg = [info objectForKey:@"color"];
self.rootController.view.backgroundColor = [BridgeColor colorWith:bg];
NSArray *views = [info objectForKey:@"subViews"];
for (NSUInteger i = 0; i < views.count; i++) {
id view = [ViewMaker makerView:[views[i] objectForKey:@"name"]];
for (NSString *key in [views[i] allKeys]) {
if (![key isEqualToString:@"name"]) {
[view setValue:[views[i] objectForKey:key] forKey:key];
}
}
[self.subViews addObject:view];
[self.rootController.view addSubview:view];
}
}
- (UIViewController *)rootController {
if (!_rootController) {
_rootController = [[UIViewController alloc] init];
}
return _rootController;
}
@end
|
PythonRun是一个工具类,起来调用Python解释器对Python代码进行执行,并通过数据与原生端进行交互,编码如下:
PythonRun.h:
1
2
3
4
5
6
7
8
9
10
11
12
13
14
15
16
| #import <Foundation/Foundation.h>
#import "BrdgeDefine.h"
NS_ASSUME_NONNULL_BEGIN
@interface PythonRun : NSObject
INTERFACE_INSTANCE
@property (nonatomic, assign) PyObject *mainItemDic;
- (NSDictionary *)run:(const char *)item method:(const char *)method;
@end
NS_ASSUME_NONNULL_END
|
PythonRun.m:
1
2
3
4
5
6
7
8
9
10
11
12
13
14
15
16
17
18
19
20
21
22
23
24
25
26
27
28
29
30
31
32
33
34
35
36
37
38
39
| #import "PythonRun.h"
@implementation PythonRun
IMPLEMENTATION_INSTANCE
- (NSDictionary *)run:(const char *)item method:(const char *)method {
PyObject* pClassCalc = PyDict_GetItemString(self.mainItemDic,item);
PyObject* pInstanceCalc = PyInstanceMethod_New(pClassCalc);
PyObject* pRet = PyObject_CallMethod(pClassCalc, method, "O", pInstanceCalc);
return [self dumpInfo:pRet];
}
- (NSDictionary *)dumpInfo:(PyObject *)pRet {
char * resultCString = NULL;
PyArg_Parse(pRet, "s", &resultCString);
return [self dumpString:resultCString];
}
- (NSDictionary *)dumpString:(const char *)resultCString {
NSString *jsonString = [NSString stringWithCString:resultCString encoding:NSUTF8StringEncoding];
NSDictionary *info = [NSJSONSerialization JSONObjectWithData:[jsonString dataUsingEncoding:NSUTF8StringEncoding] options:NSJSONReadingMutableContainers error:nil];
NSMutableDictionary *dic = [NSMutableDictionary dictionaryWithDictionary:info];
for (NSString *k in dic.allKeys) {
if ([k isEqualToString:@"subViews"]) {
NSMutableArray *array = [NSMutableArray array];
for (NSUInteger i = 0; i < [dic[k] count]; i++) {
[array addObject:[self dumpString:[dic[k][i] UTF8String]]];
}
dic[k] = [array copy];
}
}
NSLog(@"dumpInfo❄️:%@", dic);
return [dic copy];
}
@end
|
通过上面3个核心类,一个简易的Python引擎就完整了,下面还需要编写几个转换类,用来将Python对象转换成Objective-C的对象,编写BridgeColor类如下:
BridgeColor.h:
1
2
3
4
5
6
7
8
9
10
11
12
| #import <Foundation/Foundation.h>
#import <UIKit/UIKit.h>
NS_ASSUME_NONNULL_BEGIN
@interface BridgeColor : NSObject
+ (UIColor *)colorWith:(NSString *)c;
@end
NS_ASSUME_NONNULL_END
|
BridgeColor.m:
1
2
3
4
5
6
7
8
9
10
11
12
13
14
15
16
17
| #import "BridgeColor.h"
@implementation BridgeColor
+ (UIColor *)colorWith:(NSString *)c {
if ([c isEqualToString:@"red"]) {
return [UIColor redColor];
} else if ([c isEqualToString:@"white"]) {
return [UIColor whiteColor];
} else if ([c isEqualToString:@"purple"]) {
return [UIColor purpleColor];
}
return [UIColor clearColor];
}
@end
|
BridgeLabel.h:
1
2
3
4
5
6
7
8
9
10
11
12
13
14
15
16
17
18
19
| #import <UIKit/UIKit.h>
NS_ASSUME_NONNULL_BEGIN
@interface BridgeLabel : UILabel
@property (nonatomic, strong) NSNumber *left;
@property (nonatomic, strong) NSNumber *top;
@property (nonatomic, strong) NSNumber *width;
@property (nonatomic, strong) NSNumber *height;
@property (nonatomic, strong) NSNumber *font_size;
@property (nonatomic, copy) NSString *background_color;
@property (nonatomic, copy) NSString *t;
@property (nonatomic, copy) NSString *color;
@end
NS_ASSUME_NONNULL_END
|
BridgeLabel.m:
1
2
3
4
5
6
7
8
9
10
11
12
13
14
15
16
17
18
19
20
21
22
23
24
25
26
27
28
29
30
31
32
33
34
35
36
37
38
39
40
41
42
43
44
45
46
| #import "BridgeLabel.h"
#import "BridgeColor.h"
@implementation BridgeLabel
- (void)setLeft:(NSNumber *)left {
_left = left;
self.frame = CGRectMake(left.floatValue, self.frame.origin.y, self.frame.size.width, self.frame.size.height);
}
- (void)setTop:(NSNumber *)top {
_top = top;
self.frame = CGRectMake(self.frame.origin.x, top.floatValue, self.frame.size.width, self.frame.size.height);
}
- (void)setWidth:(NSNumber *)width {
_width = width;
self.frame = CGRectMake(self.frame.origin.x, self.frame.origin.y, width.floatValue, self.frame.size.height);
}
- (void)setHeight:(NSNumber *)height {
_height = height;
self.frame = CGRectMake(self.frame.origin.x, self.frame.origin.y, self.frame.size.width, height.floatValue);
}
- (void)setColor:(NSString *)color {
_color = color;
self.textColor = [BridgeColor colorWith:color];
}
- (void)setT:(NSString *)t {
_t = t;
self.text = t;
}
- (void)setFont_size:(NSNumber *)font_size {
_font_size = font_size;
self.font = [UIFont systemFontOfSize:font_size.intValue];
}
- (void)setBackground_color:(NSString *)background_color {
_background_color = background_color;
self.backgroundColor = [BridgeColor colorWith:background_color];
}
@end
|
ViewMaker.h:
1
2
3
4
5
6
7
8
9
10
11
| #import <Foundation/Foundation.h>
NS_ASSUME_NONNULL_BEGIN
@interface ViewMaker : NSObject
+ (id)makerView:(NSString *)name;
@end
NS_ASSUME_NONNULL_END
|
ViewMaker.m:
1
2
3
4
5
6
7
8
9
10
11
12
13
| #import "ViewMaker.h"
#import "BridgeLabel.h"
@implementation ViewMaker
+ (id)makerView:(NSString *)name {
if ([name isEqualToString:@"Label"]) {
return [[BridgeLabel alloc] init];
}
return nil;
}
@end
|
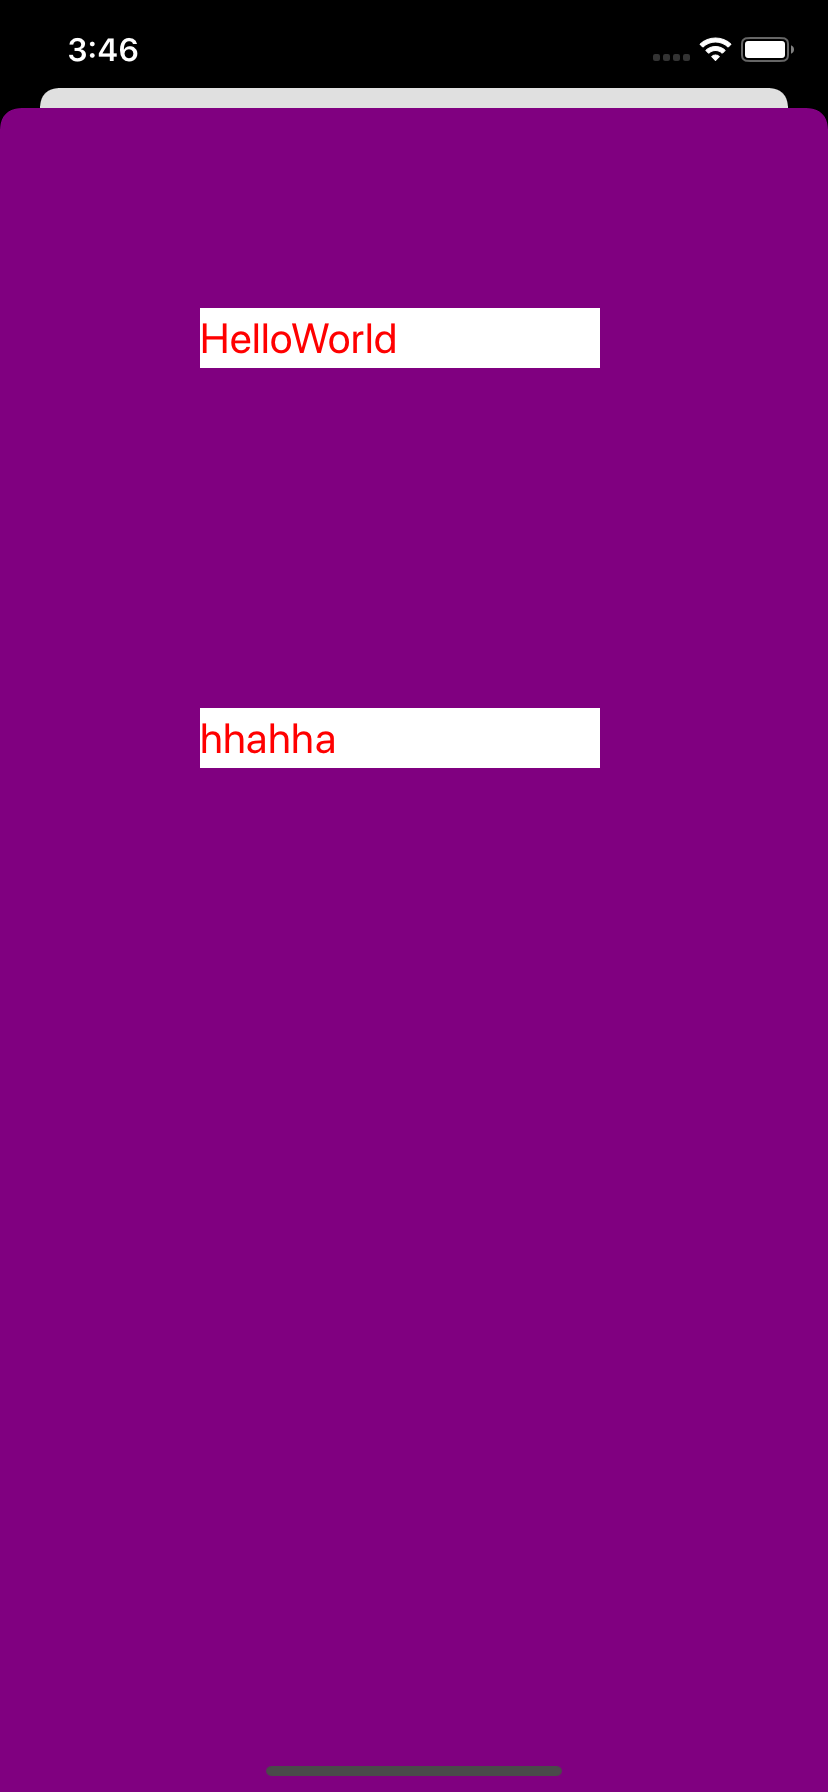
四、编写Python业务代码
在项目中添加两个Python文件,一个命名为main.py作为应用程序的入口文件,一个命名为label.py作为标签组件,main.py文件编写代码如下:
1
2
3
4
5
6
7
8
9
10
11
12
13
14
15
16
17
18
19
20
21
22
23
24
25
26
27
28
29
| import json
from label import *
class Main():
def application_Launch(self):
pass
def render_main_view(self):
l = Label("HelloWorld")
l.color = "red"
l.font_size = 21
l.background_color = "white"
l.left = 100
l.top = 100
l.width = 200
l.height = 30
l2 = Label("hhahha")
l2.color = "red"
l2.font_size = 21
l2.background_color = "white"
l2.left = 100
l2.top = 300
l2.width = 200
l2.height = 30
return json.dumps({
"color": "purple",
"subViews": [l.render(), l2.render()]
})
|
label.py编写代码如下:
1
2
3
4
5
6
7
8
9
10
11
12
13
14
15
16
17
18
19
20
21
22
23
24
25
| import json
class Label:
def __init__(self, text):
self.t = text
self.color = ""
self.left = 0
self.top = 0
self.width = 0
self.height = 0
self.font_size = 0
self.background_color = ""
def render(self):
return json.dumps({
"name": "Label",
"t": self.t,
"color": self.color,
"left": self.left,
"top": self.top,
"width": self.width,
"height": self.height,
"font_size": self.font_size,
"background_color": self.background_color
})
|
到此,一个简易的Python iOS应用Demo工程就搭建完成了,上面代码创建了两个文本标签在页面上,并对组件的部分属性进行了配置,上面实现的每个类都非常简单,作为思路的演示,后续有时间会继续补充完善,并通过博客进行连载介绍,上面工程的运行效果如下图:
五、后续设想
- 通过DisplayLink来进行页面的变更刷新,为组件增加ID,设计一种算法来实现高效的页面刷新。
- 将组件的功能完善,添加更多原生组件的支持。
- 将事件进行包装,定义回调函数,让Python端有用处理事件的能力。
- 增加更多工具接口,如网络,数据文件操作等。
本篇博客内容比较缩略,你可以在如下地址找到完整的Demo工程:
https://github.com/ZYHshao/PyNativeDemo/tree/master/PyNativeDemo
需要注意,工程较大,原因是我将Python库也放了进去,这样可以保证你下载的代码是可运行的。