理解iOS端的WebView同层组件
一 起始
同层渲染是利用原生技术来优化Web渲染一种技术,很多人了解它是起于微信开放社区发布的一篇关于小程序渲染原理剖析的文章。我将链接附上:
https://developers.weixin.qq.com/community/develop/article/doc/000c4e433707c072c1793e56f5c813
大部分的Web应用,所有的元素和组件都是渲染在WebView内部的,有时候这导致我们无法充分利用原生的强大能力,例如音视频播放,地图功能等。因此,在微信小程序开发框架中,还提供了一些以”cover-“开头的组件,这些组件本身是原生的,只是贴在了WebView上面。借助原生组件,可以极大的提高应用的性能体验,但是也有一些弊端。
- 原生组件的层级在WebView之上,因此无法在Web中通过标签的层级来调整组件的z轴位置。
- 原生组件与WebView文档流是完全脱离的,这使得布局的控制变得困难。
同层组件的出现正为解决这些问题。
二 原理
同层组件的目标是将原生组件渲染在与其他Web组件同一层级中。在iOS中,我们使用WKWebView来创建Web视图,WKWebView在进行解析渲染时,会将Web组件渲染到WKCompositingView上,这个View是一个原生的UIView子类,通常WKWebView内核会将多个组件共同渲染到同一个WKCompositingView上,但是如果某个HTML标签的style设置了overflow: scroll属性,并且内容超出容器的大小,WKWebView就会为其单独的创建一个WKChildScrollView,因此如果我们可以找到这个View,并和对应的Web组件一一关联起来,就可以将原生的组件渲染到这个View中,从而实现同层渲染。
我们可以先写一个简单的Web示例页面:
1
2
3
4
5
6
7
8
9
10
11
12
13
14
15
16
17
18
19
20
21
22
23
24
25
26
27
28
29
30
31
32
33
34
35
36
37
38
39
40
41
42
43
44
45
46
47
48
49
50
51
52
53
54
55
56
57
58
59
60
61
62
63
64
65
66
67
| <!DOCTYPE html>
<html>
<head>
<meta charset="utf-8">
<meta http-equiv="X-UA-Compatible" content="IE=edge">
<title></title>
<link rel="stylesheet" href="">
<style type="text/css">
.block {
width: 80%;
height: 300pt;
margin-top: 50pt;
background-color: red;
}
.content {
display: flex;
flex-direction: column;
align-items: center;
width: 100%;
}
.title {
width: 100%;
text-align: center;
}
.toast {
position: fixed;
width: 250pt;
height: 100pt;
background-color: gray;
line-height: 100pt;
text-align: center;
color: white;
top: 50%;
left: 50%;
font-size: 50pt;
transform: translate(-50%,-50%);
}
.native {
width: 80%;
height: 350pt;
margin-top: 50pt;
background-color: blue;
overflow: scroll;
}
</style>
</head>
<body>
<h1 class="title">H5页面Demo</h1>
<div class="content">
<div class="block"></div>
<div class="block"></div>
<div class="native">
<div style="width: 101%; height: 101%">
</div>
</div>
<div class="block"></div>
<div class="block"></div>
<div class="block"></div>
</div>
<div class="toast show">弹窗提示</div>
</body>
</html>
|
上面代码中,蓝色的色块就是同层组件容器。
在iOS中加载此页面如下:
1
2
3
4
5
6
7
8
9
10
11
12
13
14
15
16
17
18
19
20
21
22
23
24
25
| @interface ViewController ()
@property (nonatomic, strong) WKWebView *webView;
@end
@implementation ViewController
- (void)viewDidLoad {
[super viewDidLoad];
[self.view addSubview:self.webView];
NSString *html = [NSString stringWithContentsOfFile:[[NSBundle mainBundle] pathForResource:@"web" ofType:@"html"] encoding: NSUTF8StringEncoding error:nil];
[self.webView loadHTMLString:html baseURL:nil];
}
- (WKWebView *)webView {
if (!_webView) {
_webView = [[WKWebView alloc] initWithFrame:self.view.frame];
}
return _webView;
}
@end
|
使用Xcode调试工具进行查看,层级如下图所示:
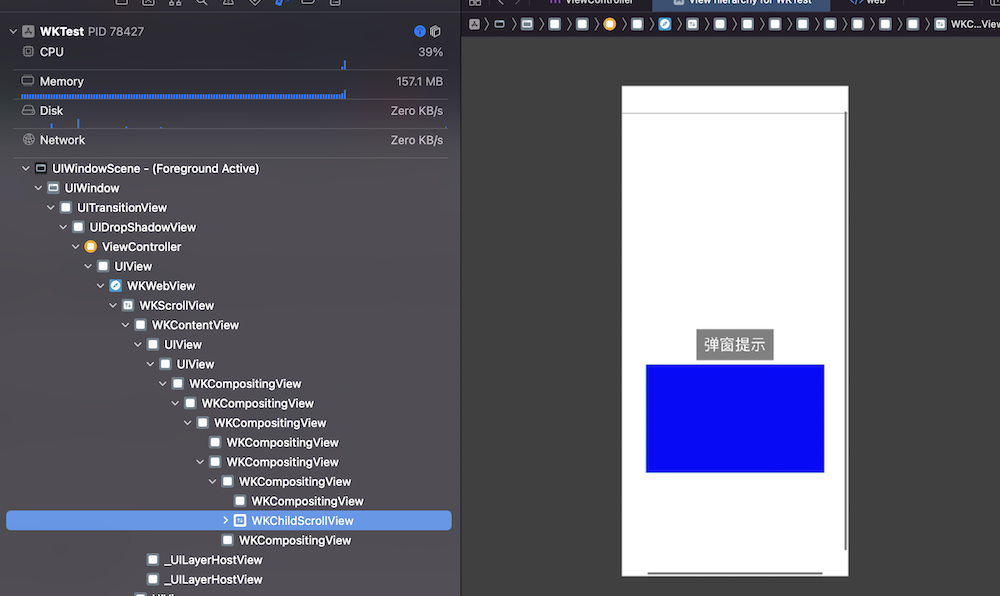
可以看到对于蓝色的色块,WKWebView单独创建了一个WKChildScrollView来承载。
三 尝试
了解了同层组件原理后,我们可以在iOS平台上做下尝试,体验同层组件的渲染效果。首先在HTML文件中补充下面的JS代码:
1
2
3
4
5
6
7
8
9
10
11
12
13
14
15
16
17
18
19
20
21
22
23
| <script>
function insertNativeComponents() {
var ct = document.getElementsByClassName("native")[0];
var id = ct.getAttribute("id");
var frame = ct.getBoundingClientRect();
var args = {
"frame": {
"y": frame.top,
"x": frame.left,
"width": frame.width,
"height": frame.height
},
"id": id
};
return args
}
setTimeout(()=>{
window.webkit.messageHandlers.nativeViewHandler.postMessage({
"command": "nativeViewInsert",
"args": insertNativeComponents()
});
}, 1000);
</script>
|
上面的insertNativeComponents函数用来找到要插入原生组件的插槽,将其id等信息传递给原生端,我们这里为了演示方便,只传递了很少的数据,实际上可以根据组件的需求向原生端传递非常丰富的数据,原生端根据这些参数来渲染和设置原生组件。
在原生端,需要对WKWebView注册一个JS交互handle,如下:
1
| [_webView.configuration.userContentController addScriptMessageHandler:self name:@"nativeViewHandler"];
|
对应的,实现协议方法如下:
1
2
3
| - (void)userContentController:(WKUserContentController *)userContentController didReceiveScriptMessage:(WKScriptMessage *)message {
[self insertNativeView:message];
}
|
核心的逻辑方法是inserNativeView,这个方法中要实现对JS交互指令的解析,以及原生组件的创建,插槽容器的寻找等,如下:
1
2
3
4
5
6
7
8
9
10
11
12
13
14
15
16
17
18
19
20
21
22
23
24
25
26
27
28
29
30
31
| - (void)insertNativeView:(WKScriptMessage *)message {
NSDictionary *params = message.body[@"args"];
NSLog(@"%@", params);
UIView *v = [self findView:self.webView str:@"" ids:params[@"id"]];
UIView *c = [[UIView alloc] initWithFrame:v.bounds];
UILabel *l = [[UILabel alloc] initWithFrame:CGRectMake(0, 0, v.frame.size.width, 100)];
l.backgroundColor = UIColor.orangeColor;
l.font = [UIFont systemFontOfSize:40];
l.text = [NSString stringWithFormat:@"组件ID为:%@的原生同层组件", params[@"id"]];
l.textAlignment = NSTextAlignmentCenter;
[c addSubview:l];
UIButton *button = [UIButton buttonWithType:UIButtonTypeSystem];
[button setTitle:@"按钮" forState:UIControlStateNormal];
[button setTitleColor:UIColor.whiteColor forState:UIControlStateNormal];
button.frame = CGRectMake(0, 200, v.frame.size.width, 100);
button.titleLabel.font = [UIFont systemFontOfSize:40];
[c addSubview:button];
if (v) {
for (UIView *sub in v.subviews) {
if ([sub isKindOfClass:NSClassFromString(@"WKChildScrollView")]) {
c.frame = sub.bounds;
[sub addSubview:c];
}
}
}
}
|
上面我们创建了一个UILabel和UIButton的原生组件做示例,插槽位置的寻找可以采用递归的方式,如下:
1
2
3
4
5
6
7
8
9
10
11
12
13
14
15
16
17
| - (UIView *)findView:(UIView *)root str:(NSString *)pre ids:(NSString *)ids {
if (!root) {
return nil;
}
NSLog(@"%@%@,%@",pre ,root.class, root.layer.name);
if ([root.layer.name containsString:[NSString stringWithFormat:@"id='%@'", ids]]) {
return root;
}
for (UIView *v in root.subviews) {
UIView *res = [self findView:v str:[NSString stringWithFormat:@"%@ - ", pre] ids: ids];
if (res) {
return res;
}
}
return nil;
}
|
我们从JS交互命令可以拿到要插入原生组件的容器id,WKWebView在创建WKCompositingView时,其Layer的name会包含id信息,这从打印的信息上可以清楚的看到,如下图:

我们能找到对应的容器,就是靠这个Layer的name属性。现在你可以尝试运行下项目,效果如下图所示:
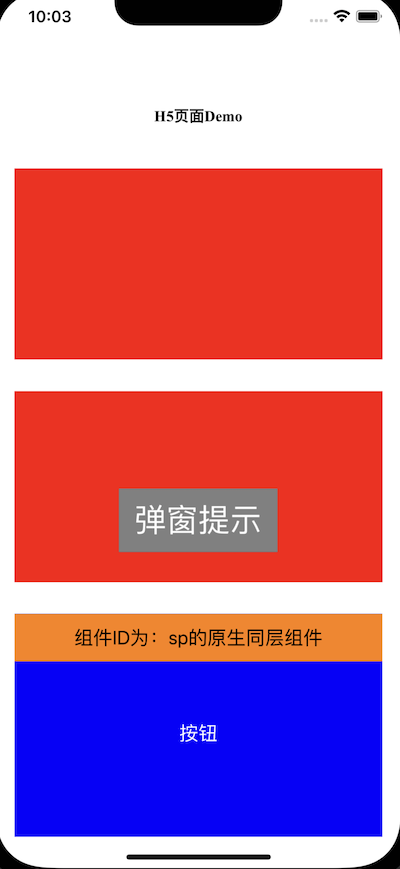
可以看到,原生组件已经正常渲染到了WebView中,且层级是受CSS控制的,其会出现在Web弹窗组件之下。
四 交互
原生组件渲染成功了,并非完事大吉,如果你为按钮增加了点击事件,会发现其并不会触发,这是因为WebView将事件都进行了拦截。要处理交互问题也非常简单,首先需要先关闭WebView的拦截,在WebView加载完成后,使用如下代码来找到WKContentView,并将其手势拦截关闭:
1
2
3
4
5
6
7
8
9
10
11
12
13
| - (void)handleGestrues {
UIScrollView *webViewScrollView = self.webView.scrollView;
if ([webViewScrollView isKindOfClass:NSClassFromString(@"WKScrollView")]) {
UIView *_WKContentView = webViewScrollView.subviews.firstObject;
if (![_WKContentView isKindOfClass:NSClassFromString(@"WKContentView")]) return;
NSArray *gestrues = _WKContentView.gestureRecognizers;
for (UIGestureRecognizer *gesture in gestrues) {
gesture.cancelsTouchesInView = NO;
gesture.delaysTouchesBegan = NO;
gesture.delaysTouchesEnded = NO;
}
}
}
|
需要注意,这个方法的调用要在WebView加载完成后。另外,我们需要将原生组件的容器组件做些修改,例如新建一个ContainerView类,如下:
1
2
3
4
5
6
7
8
9
10
11
12
13
14
| @interface ContainerView : UIView
@end
@implementation ContainerView
- (BOOL)conformsToProtocol:(Protocol *)aProtocol {
if (aProtocol == NSProtocolFromString(@"WKNativelyInteractible")) {
return YES;
}
return [super conformsToProtocol:aProtocol];
}
@end
|
之后,将此View作为原生组件的容器,渲染到WebView中,即可实现原生组件的事件交互。
五 随想
本文从原理出发,介绍了Web同层组件在iOS端的实现方式。相比直接使用原生组件,同层组件的好处是显而易见的,其既拥有了原生组件强大的能力,又可以被大部分CSS属性进行影响,方便层级和组件间位置控制。本文中也实现了一个简单的Demo来演示同层组件,Demo非常捡漏,希望起到抛砖引玉,帮助你打开创新的思路。下面是一些建议,有兴趣你可以尝试下在iOS端实现一套完整的同层组件渲染框架。
- JS与原生的交互命令可以定制一套完整的协议,如组件插入,组件更新,组件删除等。
- 传递的数据可以定义的完整丰富,例如要插入的组件类型,可能是视频,音频,地图等,各种组件在原生端的属性配置等映射。
- 原生端的交互与更新行为也需要通过JS传递到Web。
- 原生端可能需要一个容器池来维护被插入的同层组件,方便通过id寻找来进行更新等。
- 某些CSS属性对于同层组件可能并不能生效,也是需要通过JS传递数据到原生端处理。
专注技术,懂的热爱,愿意分享,做个朋友
QQ:316045346