iOS MachineLearning 系列(14)—— 使用官方模型进行预测 本系列的前面文章,详细介绍了iOS原生框架中提供的与AI相关的API的使用,使用这些API基本可以满足大多视觉,文字,语音等通用化的AI需求。但是这些API并不是万能的,对于某些定制化较强的需求,这些内置的模型可能并不能满足需求。这时就需要涉及到我们本系列文章的核心了:Core ML。Core ML是iOS种提供的Machine Learning相关框架,配套的还有训练模型的开发者工具。
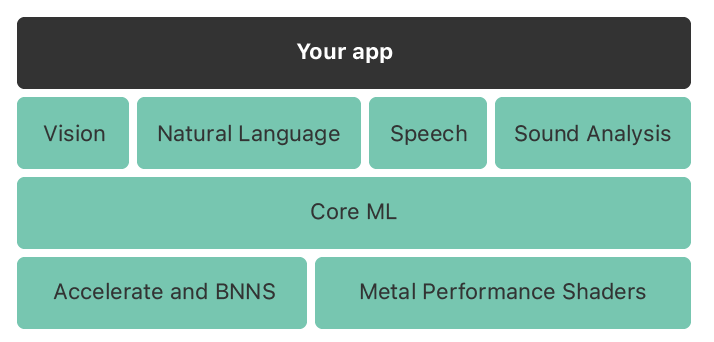
1 - 关于Core ML 通常,遇到比较定制化的AI需求时,我们会使用大量的数据进行训练,生成模型后接入到iOS应用中,之后可以在实际的应用场景中对模型进行更新与微调。之前所介绍的相关功能性API,大多是对Core ML的上层封装,Core ML本身则构建于更底层的Accelerate and BNNS 和 Metal Performance Shaders。(神经网络,大规模计算等)。结构如下图:
Core ML支持多种类型的Machine Learning模型,如神经网络,树集合,向量机,广义线性模型等。Core ML所使用的模型以mlmodel为后缀名。我们可以使用Apple提供的工具进行模型创建,训练,更新等操作,也可以将其他流行的模型训练库创建的模型转换成Core ML格式的,关于模型的训练和转换,本系列的后面文章会再具体介绍。本文,我们先来探讨下模型的使用。
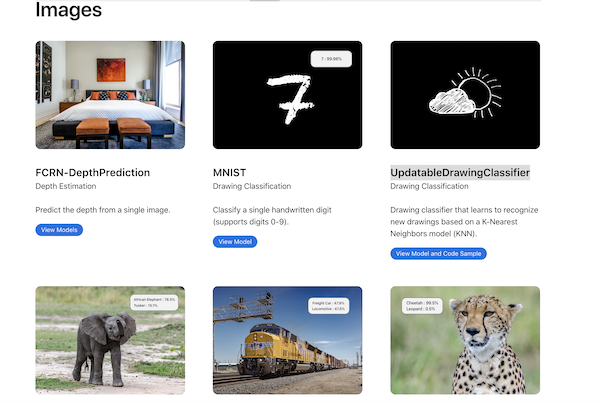
2 - 将模型集成进应用程序 Apple官方提供了许多现成的模型可以直接使用,地址如下:
https://developer.apple.com/machine-learning/models/
其中模型大多是与视觉相关的,如下图:
我们可以以MNIST模型为例,将此模型下载下来,之后添加到Xcode工程中。
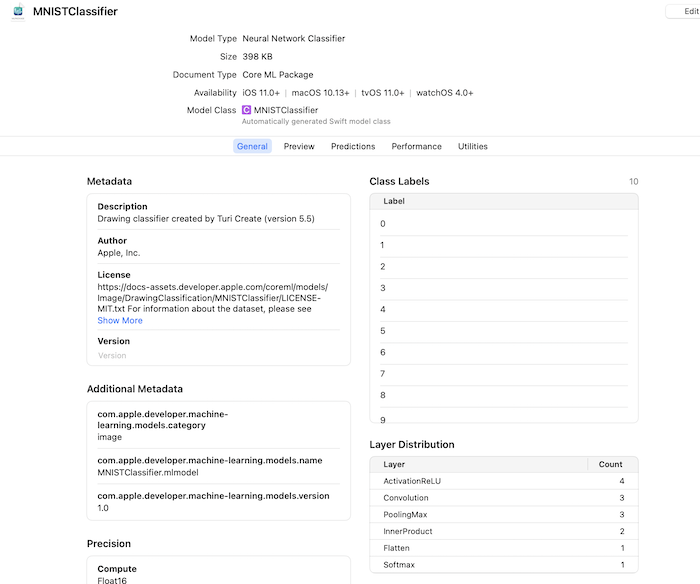
之后再Xcode种可以查看此模型的相关信息,其中包括模型的名字,简介,预测的输入输出等信息,如下:
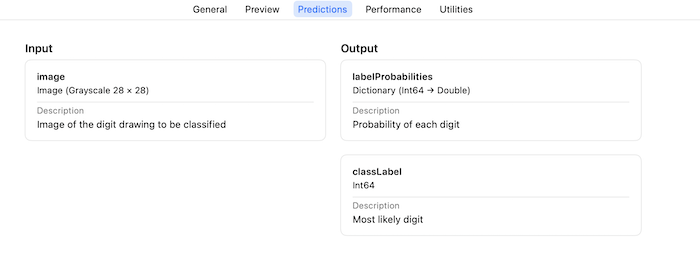
其中,比较重要的是Predictions模块,其中包含了模型的输入输出的信息,如下:
可以看到,对于MNIST模型,其输入要求的是图片,输出为labelProbabilities和classLabel,其中labelProbabilities为一组预测值,对应每个预测值的可信度,classLabel为最可信的预测值。MNIST本身是用来识别手写数字的,其最终会输出0到9之间的数。
当模型被添加进Xcode工程后,Xcode会根据模型的信息自动的生成代码,我们只需要引入Core ML模块,即可直接使用生成的代码。MNIST模型的名字是MNISTClassifier,我们可以在代码中直接生成实例:
1 2 let model = try ? MNISTClassifier (configuration: MLModelConfiguration ())
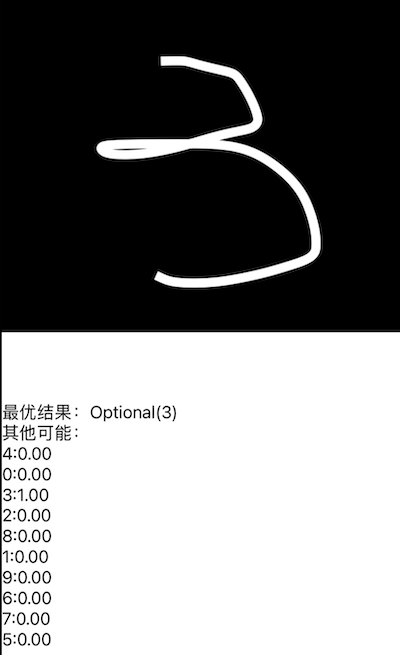
MNIST要求输入的图片是黑色背景,白色的前景的手写体数字图片,首先定义输入实例:
1 2 let input = try ! MNISTClassifierInput (imageWith: image.cgImage!)
下面可以对此输入进行预测,获取到输出值:
1 2 3 4 5 6 7 8 9 10 11 12 let outPut = try ? model?.prediction(input: input) let label = UILabel (frame: CGRect (x: 0 , y: imageView.frame.origin.y + imageView.frame.height, width: view.frame.width, height: 400 ))label.numberOfLines = 0 view.addSubview(label) label.text = "最优结果:\(outPut?.classLabel)\n其他可能:\n" for item in outPut?.labelProbabilities ?? [:] { label.text = label.text?.appendingFormat("%d:%.2f\n" , item.key, item.value) }
预测效果如下图所示:
MNIST模型的大小只有398K,可以看到其效果还是非常可观。
3 - 深入理解Core ML的使用 上面的演示代码非常简单,这是因为关于模型的加载,特征值的提取等逻辑都被Xcode自动生成的代码封装好了。MNISTClassifier本质上是对模型的加载和使用模型进行预测的方法进行了封装,可以看下其中定义的几个初始化方法:
1
2
3
4
5
6
7
8
9
10
11
12
13
14
15
16
17
18
19
20
21
22
23
24
25
26
27
28
29
30
31
32
33
34
35
36
37
38
39
40
41
42
43
44
class MNISTClassifier let model: MLModel class var urlOfModelInThisBundle : URL let bundle = Bundle (for : self ) return bundle.url(forResource: "MNISTClassifier" , withExtension:"mlmodelc" )! } init (model: MLModel ) { self .model = model } convenience init (configuration: MLModelConfiguration ) throws { try self .init (contentsOf: type(of:self ).urlOfModelInThisBundle, configuration: configuration) } convenience init (contentsOf modelURL: URL ) throws { try self .init (model: MLModel (contentsOf: modelURL)) } convenience init (contentsOf modelURL: URL , configuration: MLModelConfiguration ) throws { try self .init (model: MLModel (contentsOf: modelURL, configuration: configuration)) } class func load (configuration : MLModelConfiguration = MLModelConfiguration (), completionHandler handler : @escaping (Swift .Result <MNISTClassifier , Error >) -> Void ) return self .load(contentsOf: self .urlOfModelInThisBundle, configuration: configuration, completionHandler: handler) } class func load (configuration : MLModelConfiguration = MLModelConfiguration ()) async throws -> MNISTClassifier return try await self .load(contentsOf: self .urlOfModelInThisBundle, configuration: configuration) } class func load (contentsOf modelURL : URL , configuration : MLModelConfiguration = MLModelConfiguration (), completionHandler handler : @escaping (Swift .Result <MNISTClassifier , Error >) -> Void ) MLModel .load(contentsOf: modelURL, configuration: configuration) { result in switch result { case .failure(let error): handler(.failure(error)) case .success(let model): handler(.success(MNISTClassifier (model: model))) } } } class func load (contentsOf modelURL : URL , configuration : MLModelConfiguration = MLModelConfiguration ()) async throws -> MNISTClassifier let model = try await MLModel .load(contentsOf: modelURL, configuration: configuration) return MNISTClassifier (model: model) } }
可以看到,其中除了init (model: MLModel)方法外,其他都是加载沙盒路径中的模型。
进行预测的代码也很好理解,其就是调用了MLModel的prediction方法:
1
2
3
4
func prediction (input: MNISTClassifierInput, options: MLPredictionOptions) throws -> MNISTClassifierOutput { let outFeatures = try model.prediction(from: input, options:options) return MNISTClassifierOutput (features: outFeatures) }
对于模型的输入类MNISTClassifierInput,其也是Xcode自动生成的,如果我们要自己实现,只需要定义一个输入类,将其对MLFeatureProvider协议进行实现即可,这个协议的定义非常简单,如下:
1
2
3
4
5
6
public protocol MLFeatureProvider var featureNames: Set <String > { get } func featureValue (for featureName: String) MLFeatureValue ? }
前面通过看MNIST描述信息可以看到,其输入的参数只有一个image,因此对于输入类,其featureNames之需要返回一个“image”,可见MNISTClassifierInput的实现如下:
1
2
3
4
5
var featureNames: Set <String > { get { return ["image" ] } }
featureValue为对应的特征提供数据,MNISTClassifierInput需要提供图片数据,其实现如下:
1
2
3
4
5
6
func featureValue (for featureName: String) MLFeatureValue ? { if (featureName == "image" ) { return MLFeatureValue (pixelBuffer: image) } return nil }
MNISTClassifierInput类的核心这有这两个,其他方法都是对易用性的封装。
同样,对于模型预测的输出,其也是对MLFeatureProvider协议的实现,MNIST模型的输入有两个,分别为labelProbabilities和classLabel,其中labelProbabilities为字典类型,classLabel为Int64类型,MNISTClassifierOutput对输出进行了封装,方便我们对这两个输出特征进行取值:
1 2 3 4 5 6 7 var labelProbabilities: [Int64 : Double ] { return self .provider.featureValue(for : "labelProbabilities" )!.dictionaryValue as ! [Int64 : Double ] } var classLabel: Int64 { return self .provider.featureValue(for : "classLabel" )!.int64Value }
可以看到,Xcode自动生成的代码将Core ML根据模型描述进行了易用性的封装,使用非常方便。
完整的示例代码可以在如下地址找到:
https://github.com/ZYHshao/MachineLearnDemo
